Tuesday, June 30, 2009

Completely edible Cupcakebabs!

Cupcake kebabs are all the rage right now on Cupcakes Take the Cake. Awesome baker Nora started it all (is she the next Bakerella?!), and I just had to create my own version! I am thrilled that they are now featured on Cupcakes Take the Cake too!

Mine are a little different...I tried to make them look like actual grilled kebabs!

I took these to my friend Kara's July 4th BBQ and they were a hit! Thanks Nora for the fabulous idea! Everyone was very impressed!


Here are the basics:

Pineapple slices aka Cut-up Lemon Wafer Cookies
Cherry tomatoes aka Red Velvet Cupcakes
Steak pieces aka Cut-up Brownie pieces

The look is completed with skewers aka chocolate pocky sticks which make the whole thing totally edible!!! (I know, I'm obsessed with Pocky lately!)

Detailed How-to:

1. Bake brownies in a 13x9 or similar pan. I used dark chocolate fudge-like brownie mix from Betty Crocker...they turned out great! Let the brownies cool. Cut out squares to mimic steak pieces. I was going to draw lines with frosting to make the "steak" look grilled, but I didn't get around to it.

2. Bake Red Velvet mini-cupcakes in Wilton's Brownie Pop Pan. Only fill a little so it comes out looking round like cherry tomatoes! I haven't solidified a baking time yet...just watch them and check with a toothpick. It took at least 20 minutes. I found the longer I baked them, the easier it was for them to pop out. I only have one pan so I had to keep refilling it while I was doing other things. (By the way, I made some other cupcakes with the mix...I am LOVING the red color! Not jazzed on the flavor, but I just used a mix for these.)


3. While things are cooling/baking, get your lemon wafers ready. Cut them carefully into squares. Prepare them to go on the Pocky sticks by gently rotating a real skewer into the middle of the cookie piece. I made one hole, then made it wider on all sides with the skewer. (The pocky sticks are the right size on the end, but you'll need bigger holes to fit around the part with the chocolate cream.)


4. You are ready to make the cupcakebabs! Just stick the pieces on the pocky stick! It worked pretty easily for me; I just had to make sure the brownies were cooled off a little so the chocolate cream didn't melt off.


We ran out of kebabs at the BBQ, so I made some more using real skewers...


Monday, June 29, 2009

Messy Monday!

If you aren't familiar with Becky of Project Domestication and Utah Loves Cupcakes, let me fill you in...

She loves Utah and she loves cupcakes! I love to read Utah Loves Cupcakes to keep up on all of the Utah cupcake gossip.

Becky shared this with me:

"Okay, I have a total mess up every once in a while."

That doesn't sound too bad...

"My favorite tasting cupcake recipe is the Salted Caramel Cupcake by Shelly Kaldunski in her cookbook "Cupcakes. It's a fabulous recipe but like every other time I make it I have this:

happen!!!

I'm not sure if it sinks because I overfill the cups or if it is an altitude problem. To my knowledge all my leavening/rising ingredients are up to par."

Anyone have any advice for Becky and her yummy volcano cupcakes? (hehe. Sorry Becky...the picture just reminded me of lava!)

It sounds like she's made these cuppys a lot, so I'm sure she's not filling them too much. My thought is that it may be the altitude...a lot of recipes that I get excited about don't turn out tasting the best...but don't ask me, I'm a doughdough!

I love hearing about your mishaps! Keep the submissions coming to kitchendoughdough@gmail.com!

Strawberry Shortcake Cupcakes


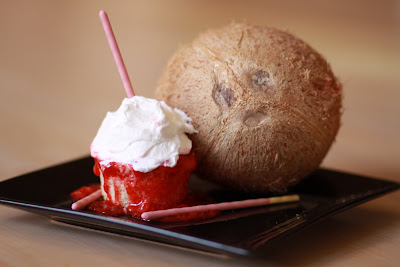
This is my IronCupcake:Earth entry for June's Summer Berries challenge! These turned out to be one of my FAVORITES!!! This was also the first recipe I completely made up and just gave it a try...although I have become pretty knowledgeable about what/how much goes in a cake recipe, so it wasn't too daring! What I loved about the recipe is I tried it by just combining ingredients and not really paying attention to any steps...if you are like me, you don't like having to pay too much attention to recipes! The dense, coconut-y cupcake went perfectly with whipped cream and strawberry glaze! I was SO excited with the results. I am just loving how cupcakes turn out when you add coconut milk.

Strawberry Shortcake Cupcakes

Dry ingredients

2 1/2 cups cake flour
2 teaspoons baking powder
1 teaspoon salt
1/2 cup brown sugar
1 cup sugar

Whisk!

Wet ingredients

1 14 fl. oz. can full fat coconut milk (or 1 2/3 c.)
1 teaspoon vanilla
2 egg whites

Whisk!

Combine and beat the mixture. Put in cupcake liners or grease pan. Bake at 350 until a toothpick comes out clean. Easy, huh?!

Whipped Cream

I'm pretty sure everyone knows how to make whipped cream! Just beat heavy whipping cream until it forms soft peaks, add sugar to taste, beating after each addition!

Strawberry Glaze

I used a package of Junket Danish Dessert Strawberry Pudding/Pie filling/Glaze. (Anything similar would work great!) Then I put strawberries in a food processor and added them to the glaze. I made cuts in the top of the cupcakes so the glaze would soak into the cupcake. (The cupcakes are so dense that just poking holes with a toothpick wasn't enough!


The final touch was my favorite: strawberry pocky sticks!!! I am now addicted to them! They are Japanese biscuit sticks with strawberry cream on them. (See top picture.)

One last thing...any idea what I tried adding to some of the cupcakes?

I thought I was SO clever when I thought of adding gum to a cupcake...yeah, not so much. They sunk to the bottom while baking, and of COURSE they melted. What was I thinking? (Well, I was thinking strawberry gum might be a creative addition to my entry...)

Saturday, June 27, 2009

4th place at i heart faces!

This has nothing to do with food, but I just had to share some exciting news! My adults entry in this week's contest at i heart faces was picked for 4th place! These are my cute boys on their first carousel ride! My husband absolutely adores our son, and I love how this picture captures their bond. Let's hear it for my boys!! (That was this week's theme!) I'm even more thrilled that this was picked by a guest photographer judge, Lori Nordstrom!

Tuesday, June 23, 2009

Totally spaced it on Messy Monday!

It is barely Tuesday, so hopefully you'll forgive me. I'll tell you what I was doing all day on Thursday's post...

But for now I do have a funny story to share! I laughed out loud at this submission from Frieda of friedalovesbread.blogspot.com! Perfect for a messy Tuesday...

"I love my Kitchen Aid mixer. My boys gave it to me for my birthday several years ago, knowing that they would be the beneficiaries of home baked goodies. 51 weeks later, I was making some wheat bread dough, which takes quite a bit longer to knead than the traditional white dough. I decided to leave the kitchen "just for a moment." The smoke alarm came on. I went back into my kitchen and my Kitchen Aid was on FIRE! Flames were spouting out of the sides of the on/off and lock switches! The flames were only centimeters away from the underside of my cabinets...I yanked the cord out, pulled the mixer away from the cabinets and waited for the flames to die down.

I called Kitchen Aid and they said, "What?! Your mixer caught on fire? What were you doing?" After giving them the details, they reminded me that I still had one week left on my original first year warranty. They sent me a brand spanking new mixer, complete with a shipping label to return the fried one.

I am happy to say this mixer has served me well over the 15 years, though I still watch it closely...
"

Too funny! Who knew a mixer could go up in flames...and not just any mixer, the famed Kitchen Aid! Thank goodness it happened on week 51, and thank goodness for Frieda's story to give us a laugh!

Submit your messy kitchen stories and/or pictures to kitchendoughdough@gmail.com!

Sunday, June 21, 2009

Sesame Street Birthday Party


I had so much fun making two cupcake towers and a cake for my friend's son's first birthday party! My friend and I looked on the internet and saw a TON of darling examples, so these are definitely nothing new! I used the examples we saw as inspiration to create the cake and cupcakes.

The birthday boy who turned 1!

Big Bird cupcake on a cake! I LOVE his legs! I was in a rush, so I didn't have time to make them look as good as they could have. They are made from mango laffy taffy sticks and fruit loops. I made the feet with fondant. Eyes are melted white chocolate, frosting, and mini choc chips. I made the beak from fondant. The feathers are made with a #61 decorating tip. I think a leaf tip may have worked well too.
Another view of the cake. My friend loved the sign she saw on the adorable cake by The Little Cupcakery. Click here to see the cake on flickr! Can I just give a shoutout to Australians?! So many of the cutest cakes and cupcakes I've seen were made by bakers in Australia! I made the sign with fondant...which was not my favorite thing to use for letters, I'm too impatient! I'll be posting about my fondant experience soon. (Get ready for a disaster averted!)

Mouths are made from Oreos, eyes are upside down white candy melts, blacks of eyes are made with a round tip and black frosting. Oscars eyebrows were my FAVORITE!! I used a basketweave tip and brown frosting. I also liked my idea to turn the cookie upside down for Oscar's mouth. Elmo's nose is a peanut m&m. Grover is seen in the top picture, made with a red m&m and a piece of red twizzler cherry pull-aparts.

Detail of cookie and big bird. Cookie Monster was SO easy! I just used a grass/hair decorating tip and stuck a cookie in his mouth! Below are a bunch of the Elmos! My friend and I's inspiration for the Elmo cupcakes came from Kara's Cupcakes. Be sure to hop over to her site to see her creations!

Wednesday, June 17, 2009

Check out this cute cupcake!

Now check out the onesie! LOVE it! My friend's darling baby modeled this fun cupcake onesie made by her sister-in-law. I told her she needs to sell these! Too cute! Maybe I can get one for my upcoming giveaway...

i heart faces kodak printer giveaway!

Can I first just mention that I am working on a great giveaway! You're probably thinking, 'Your blogaversary is not even close...why would you be having a giveaway?' It's a surprise, but it's going to be awesome! (in my humble opinion, anyway!)

Okay, the awesome Kodak printer giveaway! It's worth 300 bucks, so it's totally worth your time to enter! And I'm sure you'll enjoy the i heart faces site while you're there! The site is so fun...they host weekly photo contests and anyone can enter. I entered this picture of my son for this week's sepia contest:


Monday, June 15, 2009

Messy Monday!

Thanks to Jen at Delightful Delicacies, we have a Messy Monday!

I laughed out loud when I saw this picture:

I only laugh because it looks like something I would do! And I had no CLUE what it was! Any guesses?

Jen tried a recipe for a Daring Bakers challenge, and says on her blog, "I'm sure you're wondering 'what in blue blazes does this picture of tar have anything to do with a Daring Bakers challenge?'"

Did anyone guess lavash? If you're a doughdough like me, you don't even know what lavash is! (and is it la VASH? or la VOSH? lay-vush?)

This is what Wikipedia had to say:
Lavash (also known as crackerbread) is a soft, thin flatbread made with water, flour, and salt. (Click here to see the full article!)

You'll learn even more at delightful delicacies! Go there to get some more laughs and some fabulous recipes. You'll see that this was truly a fluke, for she is an awesome cook!

I don't think I've ever looked forward to the next Monday on a Monday! Keep the submissions coming to kitchendoughdough@gmail.com!

Messy Mondays

Be a guest blogger on kitchen doughdough: I want to hear about your messes!

Last night after baking strawberry shortcake cupcakes (they were delicious...post coming soon!), my kitchen was again a disaster. Every time I bake I have the hardest time keeping things clean and organized. Scroll down to the end of this previous post to see an example. (Shameful, I know.)

So, I thought, why not give the world's kitchen doughdoughs a chance to show off their kitchen disasters?! Please email kitchendoughdough@gmail.com with your kitchen catastrophes and include pictures if you can! You can submit pictures of the aftermath of your culinary experiences, a story of a good meal gone bad, accidents in the kitchen-anything you think is an entertaining mishap! I am SO excited to hear from you. I will feature your submissions each week on Messy Mondays! (My Mondays are always messy whether I'm in the kitchen or not!)

Thursday, June 11, 2009

Monkey See, Monkey Do

My son's "lair," as my mom called it, is being featured on Project Nursery today! Click here to go to the "Real Rooms" section; the rooms are absolutely amazing! I am really embarrassed about the photos on my feature...they were taken before I got my new camera! It's funny how my eye has changed since I've been looking through the lens of my Canon EOS 50D. (Had to put in a plug for it, I LOVE my camera!)

Friday, June 5, 2009

Would you like fries with that?

I LOVE the different examples of hamburger cupcakes that I've seen on the net...except how can you have a burger without fries?! 


The idea for these cupcakes actually came to me at church! The speaker made an analogy using McDonald's french fries, so naturally I was craving them...then later in our meetings, a child received a Kit-Kat for their birthday, and inspiration struck! Cupcakes in a french fry box with Kit-Kat fries! 

I loved making these because it was really easy...if you don't mind dealing with chocolate. (I hate cleaning up the mess after it hardens!) Even if you are a doughdough like me, you can make these for the dessert at your next BBQ!

French Fry Cupcakes How-to:


Step 3: Put the cupcake boxes on a baking sheet. Bake your cupcakes until a toothpick inserted into the middle comes out clean. I had to bake mine for about 25-30 minutes. 

Step 4: Frost your cupcakes. I just used basic vanilla buttercream. Like the Star Trek boxes? At first I was bummed they didn't have ones with the BK logo on them, but then I figured Star Trek is popular right now, so kidlets would probably enjoy the box. 

Now you are ready to make the fries! You'll need mini Kit-Kats (they come wrapped in twos in a big bag in the candy section), white chocolate chips, and yellow icing color (or food coloring). 


Step 1: Prepare the kit-kats by opening the packages and breaking them apart. Put out some parchment or wax paper out on your counter to put the fries. 


Step 2: Melt the white chocolate in 20 second increments in your microwave. Stir after each time until it is smooth. 

Step 3: Add lemon yellow icing color or yellow food coloring to the chocolate and stir until it is the color of fries! 

Step 4: Put each kit-kat piece in the white chocolate individually. Use a fork to turn it around to the other side, lift it out of the chocolate, and place it on the parchment paper. Don't worry if traces of brown show from the Kit-Kat chocolate; it makes it look like they are toasted a little!


Step 5: After the chocolate has hardened, use a knife to saw off the excess chocolate. 

Step 6: Gently push the fries down into the cupcake, and voila, you have  french fry cupcakes! 


Another thing I tried was to add the cupcake mix directly into a McDonald's fry box that I had on hand. I used the reject fries in this one, but I like the pic! 

Note to Self: Don't bake with fry boxes that have had fries in them; the whole house reeked of burning grease!