Thursday, April 30, 2009

Sock Monkey Nursery

So I uploaded these pictures in the order I wanted them, but they are backwards! It doesn't really matter except first I was going to talk about the sock monkey quilt pictured last...are you still with me? (If I've lost you, at least click on the link at the end of the post.)

I was having the hardest time deciding what to do for my son's nursery. We're not big sports fans, and I wanted it to be creative (and honestly, something that was challenging...I love the hunt when I pick a theme!). My mom made me the adorable sock monkey quilt and I was instantly a fan. Luckily, they were coming back in style and we found SO many cute things.

Above you'll see my son modeling his adorable sock monkey bib made from a talented seamstress/friend Roxanne. LOVE this sock monkey vampire!
A fun lamp from Ikea, pictured next to a cute sock monkey light switch cover.


Sock monkey clock, box, and blocks!
The walls were hand-painted by mom talented mom, who also made the valance. I chose the rope at Home Depot and we attached it and hung the monkeys. You'll also see on the changing table a diaper bag and changing pad my mom made, and a wipes holder and diaper holder that were gifts from a friend who loves finding things for themes as much as I do! Click on the pic if you want a better view.


My latest purchase...I found this jungle leaf bed canopy at Ikea! It matches perfectly. I REALLY want to use my hubby's idea to get more and alternate them on the ceiling so you feel like you are in the jungle...someday. Notice the night light-I love it!
The adorable sock monkey frames were also a gift from my friend. My mom made the sheets. I recently found the wall stickers (along with a HUGE sock monkey that I sadly had to walk away from)...the sock monkeys look so cute hanging from the tree!

Last but not least, you HAVE to click here...trust me, it's worth it. You'll laugh.

Ta-DA! Say hello to sock monkake!


Yay! I created a sock monkey cupcake that looks like a sock monkey! It was a LOT harder than I thought, but I now know what I am doing. It ended up being more like a mini-cake...but it is made of all cupcakes. Here is what I ended up doing:


The hat and ears are pieces cut from a cupcake. The nose is an upside down mini cupcake. I added the eyes (made from Oreo cakesters...I just pulled off the cake part and rolled it in my fingers to look like eyes) and frosted the ears and then used long chocolate sprinkles and clear sugar sprinkles to frost the white frosting. Next, I added the raspberry part of the newton, frosted the snout around it with white frosting, and added clear sugar sprinkles. I added more frosting to the hat (and clear sprinkles) and face and used a small round tip to pipe the hat, after coloring some frosting red. The final touch was two chocolate sprinkles on the snout.

Now that I've shown the final, here are some of my prototypes:


My original idea was to slice off the end of a raspberry newton...I still think it's a cute way to make them.
Here's one with the ears made of the Oreo cakesters.

I found a cute way to make sock monkey cupcakes easily if you aren't into cake cutting and decorating...click here to see.

Sock Monkey Preview

I've been on a quest today to make the closest replication of a sock monkey that I can with a cupcake! (Remember I said I - I'm sure someone else could do better!) I am obsessed with sock monkeys-I chose it for my son's nursery theme and I've been collecting things ever since! I've seen some adorable monkey cupcakes, but I just had to do a sock monkey cupcake! It is taking longer than I thought...I think I finally have it how I want it after many attempts. I am really tempted to show you, but it looks sloppy at the moment and I need to make some "final copies." So for now I'll show you the first steps.

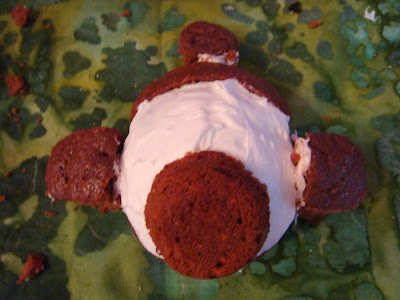
Below is the basic form of the monkey head, the cupcake, frosted with white frosting, and an upside down mini cupcake...


Here are some of the pieces. Are you curious yet???

Monday, April 27, 2009

Cupcake Par-tea!


My friend Kara and I are having a cupcake tea at the end of May! In Seattle last month, my mom took me to all the cupcake hotspots and I was addicted at once! My mom and her friends were planning a cupcake party, and I had to join the fun! I immediately called my friend who is a cupcake fanatic and we've been obsessing ever since. She had the cutest idea to have a cupcake tea...so while at Ikea this weekend I just had to have this little teaset! I thought it would be so cute to put mini cupcakes in them for the party. So here's a sneak peak.


While talking cupcakes at Kara's this weekend, her husband said we should just put the placecards in the mini-cupcakes we set at their places. So here's an idea for the placecards...it was Kara's brilliant idea to have a sit-down set-up! I found the wire and wire cutters in my hubby's architecture supplies-it was SUPER easy to make.

By the way the background is a shower curtain I found at Ikea-it's going to be so cute as a tablecloth for the party.

Click here to see the adorable par-tea invites Kara made!

Posted by Picasa


An added bonus of the Ikea teaset was these mini ice cream cups! I love the mini cupcakes in them.

Cupcakes Take the Cake!!!


I'm so thrilled to be featured on Cupcakes Take the Cake today! I can't believe it. Click here to see the direct link. Thanks, Rachel!
Also a big thanks to my inspiration, bluecupcake! I'm grateful for her amazing creations that led a new baker to create a simple cupcake decoration!

Bruschetta Sandwiches

So here's an update on my meal planning: We had leftover honey-glazed chicken Thursday and Friday, grilled cheese Saturday for lunch and dinner at Ikea, and today I don't even know what we ate...needless to say, I'm not doing very well yet. But I did come up with a delicious meal to eat for dinner tonight! I wanted to spice up our grilled cheese sandwiches, and I thought of how much I love bruschetta, so here ya go. (I'm sure this isn't a unique idea, but I'm glad I thought to make it! It's yummy!)

Bruschetta Sandwiches

French bread, sliced
Mozzarella Cheese, shredded (it cooks more evenly, according to America's Test Kitchen)
Tomato, diced
Fresh Basil

Turn on your oven broiler and set to high. Prepare the sandwich by adding the cheese on a slice of bread (or as many slices as sandwiches you want). Add the tomatoes and basil. Add more cheese to the top if you'd like. Butter the top of the bread for the opposite side of the sandwich. Place the bread on a baking sheet.

Now stick the sheet in the oven and broil your sandwich! Watch for the top of the buttered slices to be toasty brown and the chesse to be melted. You're ready to take it out, assemble your sandwich, and enjoy!

Posted by Picasa

Friday, April 24, 2009

Red Creme Soda Cupcakes for the Iron Cupcake: Earth April Challenge

Posted by Picasa

I have been so excited to create these cupcakes since I first heard the Iron Cupcake: Earth cupcake challenge was soda pop! (They challenge bakers each month with a new ingredient. Check out their site at http://www.ironcupcakeearth.com/)

To decorate the cupcake, I put Barq's Red Creme Soda in the bottom of a glass, and cherries for added decor. I dropped the cupcake in the mug, letting the creme soda soak the very bottom of the cupcake. Next, I piped the frosting to look like ice cream using a 1A decorating tip. Finally, I wolfed it down with a fork! I LOVE anything cherry. I also added a straw so I could sip some of the red creme soda from the bottom. It's my favorite soda pop, after all, which is where I got the inspiration for my cupcakes. In our house, we love to make red creme soda floats, hence the decorating idea.

As for the contest, I thought I had until the end of the month to make and submit my cupcake...turns out it was due today at noon CENTRAL time! Yikes, I'm in mountain time, which means 11 AM! This morning I went as fast as I could (I even had to use a cake mix in the recipe-probably a huge blunder for iron cupcake!) and finished my creation on time-BARELY! I love how light and moist they turned out. Next time, I'd definitely make my own white cake, which was the original plan. Next time I need to pay more attention to the deadlines...but that's typical of me-I'm such a procrastinator!

Red Creme Soda Cupcakes

1 white cake mix (or a white cake from scratch and skip the water, oil and whole eggs)
1 c water
1/3 c oil
3 whole eggs
1/4 c Barq's Red Creme Soda
1 T Stasero cherry syrup

Preheat oven to 350. Prepare cupcake (muffin) pans by spraying cooking spray (I use Baker's Joy) or lining with baking liners. Stir cake mix, water, oil, and eggs until moistened. Add red creme soda and cherry syrup. Beat with a mixer on low speed for 2 minutes. Fill each part of the cupcake pan/liners 2/3 full. Bake about 16 minutes or until toothpick inserted in center comes out with just a few crumbs attached to it. This time is for 12 cupcakes.


Red Creme Soda Frosting - Adapted from America's Test Kitchen's Quick and Rich Vanilla Frosting

2 tablespoons whipping cream
1 teaspoon vanilla extract
Pinch salt
2 1/2 sticks unsalted butter, softened
2 1/2 cups confectioners' sugar
1 T Stasero cherry syrup
1 T Barq's Red Creme Soda
15 maraschino cherries (you could just do 2/3 cup)

Stir the cream, vanilla, and salt together in a small bowl. Beat the butter on med-high speed until smooth. Reduce speed to med-low. Add the confectioners' sugar slowly and beat until smooth, about 2-3 minutes.


Beat in the cream mixture. Add cherry syrup, red creme soda, and cherries. Beat on high to puree the cherries. Beat until mixture is light and fluffy, about 3-5 minutes.


I'm competing to win the following prizes!

Our April ETSY PRIZE-PACK is from artists:
A creation by FRUITFLYPIE, http://www.etsy.com/shop.php?user_id=16748
a pair of cupcake earrings from LOTS OF SPRINKLES at http://www.etsy.com/shop.php?user_id=6057281.
a sweet surprise from Sweet Cuppin' Cakes Cupcakery, http://www.acupcakery.com/
PLUS, IronCupcake:Earth can not forget our good friend, CAKESPY, http://www.etsy.com/shop.php?user_id=5243382, who is now going to be doing a piece for our winner each month until further notice - sweet!Last and certainly not least, don’t forget our corporate prize providers: HEAD CHEFS by FIESTA PRODUCTS, http://www.fiestaproducts.com/, HELLO CUPCAKE by Karen Tack and Alan Richardson, http://blog.hellocupcakebook.com/, JESSIE STEELE APRONS http://www.jessiesteele.com/; TASTE OF HOME books, http://www.tasteofhome.com/; a t-shirt from UPWITHCUPCAKES.COM http://www.upwithcupcakes.com/. Iron Cupcake:Earth is sponsored in part by 1-800-Flowers, http://www.1800flowers.com/ .

Tuesday, April 21, 2009

Blog Design

I never thought I'd learn how to use Adobe Photoshop. However, I am very impatient (and impulsive!) when I get an idea, so I'll muddle through something rather than wait for help. When I decided to start my own blog, I really wanted to design/create it myself. Pretty soon I was learning html (all the info is out there on the internet!) and photoshop (the hubby is an architect and was a big help when I hit roadblocks)!

Thanks to my neighbor Preston (also an architect-they went to school together) who took my dodo drawing and got it up on photoshop for me. Check out his blog http://www.deanworks.org/

So, voila, I'm ready to share my blog...I think! It's hard to feel like it is completely ready, but I can always make changes in the future! I still have many posts to catch up on, but I guess it is better to save them to keep your interest!

Monday, April 20, 2009

A fabulous cookbook for kitchen doughdoughs!

Before I tell you how excited I am about my new cookbook, I thought I'd better look up the definition of dodo and make sure I'm using it the right way. Of course, the first definition was about the bird. It reminded me that the dodo is extinct. Let's hope that as a cook and a blogger I don't end up extinct like the dodo! The second definition was "a. one hopelessly behind the times b: a stupid person." Okay, so I don't think it would be wise to insult my readers by calling them "kitchen dodos," i.e. stupid people. I am a beginner in the kitchen, and I've definitely done my fair share of stupid things in the kitchen, but I'm not stupid, and I know others aren't either! However, I would say I am behind in my kitchen skills, especially for being married almost 9 years! 9 years of mostly eating out. 9 years of spaghetti, tacos, and a few other recipes that are super easy. It is time for me to learn how to cook!


I'm certain my new book will help me. I bought The America's Test Kitchen Family Cookbook at Costco for about 20 bucks. It is so user friendly, and has all the basics. My main cook book for reference has been the Better Homes and Gardens cookbook. It had great info, but every time I looked through it for something to make, nothing popped out at me. We have a couple recipes we make from it, but other things we've tried haven't been that great...I'm sure because I've messed them up! The Test Kitchen book tests recipes over and over, so I'm hoping I'll get better results. There are tons of pictures and step by step instructions. I love that on every few pages there are pictures of what things should look like, and what they shouldn't look like. Just by flipping through the cookie and cake sections (which are marked by tabs), I have found the correct way to do things I messed up on last week when baking for Max's party. The creators promise on the back, "Our recipes work, the first time and every time. As we like to say, 'We make all the mistakes, so you don't have to.'" I'm sure I'll still make mistakes, which is how I learn, but I'll sure feel better if there aren't as many at once!

Blog Glossary:
Kitchen dodo: someone that has done stupid things in the kitchen
Kitchen doughdough: someone that wants to further their knowledge about things pertaining to the kitchen

"I am learning all the time. The tombstone will be my diploma." ~Eartha Kitt

"Learning is like rowing upstream: not to advance is to drop back." ~Chinese Proverb

Sunday, April 19, 2009

My boy at one year

I'm hoping to start a photography blog to post my favorite pictures. Since I don't know when I'll get around to it, I just had to post this picture I took of my little angel! Happy first birthday, Maxwell! Posted by Picasa

Monday, April 13, 2009

Where the Wild Things Are Party


Posted by Picasa
The wild things were at my house for my son Max's first birthday! I love parties, especially when there is a theme involved. I threw lots of parties for my third graders when I was a teacher. However, I'm not quite used to entertaining adults (see my note to self)! But wait, wasn't the party for my son? Okay, we all know first birthdays are more for the parents. Max and his little friends had a great time too though!

The guest of honor was dressed in this adorable Max costume from the book!

Here is the cupcake tower I created for the party. Click on the pic to get a close-up of the cupcakes. (There is more info on my inspiration and recipes on my cupcake tower post.) My mom made the cake/cupcake toppers of Max from the book with my Max's face on it. I bought the Where the Wild Things Are cupcake topper rings from ebay. The kids at the party took home the rings as party favors.

Here's my Max with his monster toy that I ordered from Amazon. I'm still waiting on a Max bobblehead that I ordered-they sent me a Maxwell Smart instead! We used the big floor puzzle that has a picture from the book to entertain the kiddies for a little bit.

I created Max's boat out of butcher paper, mimicking the one in the book that Max uses to sail to "where the wild things are".

Posted by Picasa

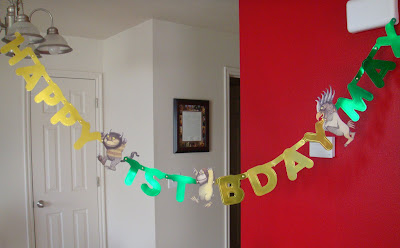
I love the new banner pieces you can buy...I picked the colors and letters I wanted and added pictures of the monsters from the book to complete the banner.

I used a crown cookie cutter for these "king of the wild things" cookies. They were delicious! I used my mom's sugar cookie recipe...I'll bake some more soon and post the recipe-you've got to try it!

Here's the awesome table cloth my mom made. I scanned the pictures from the book and she ironed them on using photo transfer paper.

Daddy read the book to all the kids at the party. They were riveted! Below is another pic of my little king of the wild things. My mom made the adorable costume because I had to have him dressed up as Max from the book! I added the wolf tail and made his crown. I bought a crown at a party store, cut the top into points like the book, and added the wolf fur to the crown. He also had a royal scepter rattle to complete the look.


Note to self: Next time I throw a party 1) bake a little the night before (hopefully it won't be Easter next time!) 2) be ready when your guests are instructed to arrive (yes, I was still frosting cookies and filling the punch bowl as they were arriving) 3) don't let your husband fill up the pitcher (he left it filling up on the fridge water dispenser and it spilled all over the floor...yes, the guests were there to witness it) 4) clean up ALL of the dog feces from your yard (even though my hubby picked up the feces from the main part of the yard and it was out of the way, it was still a faux paw, as you could see some at the side and I'm sure it wasn't very appetizing!)

Where the Wild Things Are Cupcake Tower


Here's a pic of the (shortened) cupcake tower I made for Max's first birthday party. My inspiration came from blue cupcake's cupcake tower that was inspired by the book. Check out her cupcake towers, they are amazing!

http://bluecupcakebyjulie.blogspot.com/2009/03/cupcake-towers.html


Making the Cake:
The "king of the wild things" cake I created was a little difficult, but it was fun to make. I used a 6x4 inch cake pan to bake a chocolate cake mix (didn't have time on Max's day to bake from scratch!). I lost track of baking time as usual (I promise to have more clear recipes in the future!), but I used the toothpick test to make sure it was done. When the toothpick came out clean, I took it out of the oven. I know this cake can be improved upon, but I used graham crackers to make the top of the crown. I took a square piece and cut it gently with a knife diagonally. Then I flipped it to make the crown pieces.


The graham crackers I used were really flaky and broke easily, but I managed to get enough pieces to make the cake work. I frosted the cake first (forgetting to dye the frosting gold-oops!) and put a lot of frosting on top and around the top. I frosted around the entire graham cracker piece with a small butter knife and stuck it on the cake. I continued until the crown was complete. I added frosting where needed and tried to smooth it out. Finally, I added dusting crystals, but it didn't cover the whole thing like I wanted. The frosting wasn't smooth enough and it was hard to add to the side of the cake. I would frost and dust the cake first next time. It would be hard to dust the frosting on the crackers before you stuck them on because you have to touch it and it will get messy. Ideas, anyone? I also really wanted to add "they made him king of the wild things" to the cake somehow, but didn't quite get to it.

Monster Cupcakes: These monster cupcakes were inspired by the ones on blue cupcake's cupcake tower. Since I haven't used fondant (yet!) I decided to create my own version using cashews, lemonheads (with the eyes drawn on with edible markers), and slivered almonds. Aren't the paper cups cute? I got them at a fabulous cooking store, Orson Gygi.

To decorate with frosting, I used tip #12 round and piped it up. (Is that the right term? I'm still learning, here!) After the party, I got around to creating the monster that has hair in the book (see below). I used tip #233 multi-opening. Isn't he funny? Obviously, I need to practice using that tip some more. And now for the recipe...


Old Fashioned Applesauce Spice Cupcakes - adapted from a Duncan Hines (r) Cakebox Recipe

1 package spice cake mix (I used Duncan Hines Moist Deluxe)

3 large eggs

1 1/4 cups applesauce

1/3 cup vegetable oil

Preheat oven to 350. Prepare cupcake pan by adding paper liners (or greasing). Combine cake mix, eggs, applesauce, and oil in large bowl. Beat at medium speed with electric mixer for 2 minutes. Pour into cupcake liners, 3/4 of the way full. Bake at 350 for about 20 minutes, or until toothpick inserted in center comes out clean. Cool in pan on wire rack for 15 minutes. Cool completely before frosting.


Cinnamon Buttercream Frosting - adapted from my mom's vanilla buttercream frosting recipe http://www.potsandpins.com/blog/2008/03/sugar-cookies-f.html

1/2 cup butter, softened (do not substitute)
1 teaspoon vanilla
1/3 cup milk
1/4 teaspoon salt
1/2 teaspoon ground cinnamon
powdered sugar (approximately 4 to 5 cups)

Cream butter in the bowl of an electric mixer. Add vanilla, milk, salt, and cinnamon. Add 2 cups powdered sugar and blend, adding more powdered sugar to get the consistency you want. (To pipe the frosting, you'll want at least 4 cups total. You want it thick.)

After you taste it, you may want to add more cinnamon and blend again.


Max cupcakes: To decorate this cupcake, I used tip #22 star, and the cupcake toppers my mom made.
To make this cupcake, I used a lemon cake mix, but I did make the frosting from scratch. If you love lemon, you will LOVE this frosting!

Lemon Buttercream Frosting - adapted from my mom's vanilla buttercream frosting recipe http://www.potsandpins.com/blog/2008/03/sugar-cookies-f.html

1/2 cup butter, softened (do not substitute)
1 teaspoon vanilla
1/3 cup milk
1/4 teaspoon salt
Zest from 1 lemon
powdered sugar (approximately 4 to 5 cups)

Cream butter in the bowl of an electric mixer. Add vanilla, milk, salt, and lemon zest. Add 2 cups powdered sugar and blend, adding more powdered sugar to get the consistency you want. (To pipe the frosting, you'll want at least 4 cups total. Just keep adding a cup at a time until it is thick enough.)

Posted by Picasa